I vestiti nuovi di Todeschino, un lavoro a 4 mani portato avanti da me e Francesco :)
Todeschino's new clothes, a 4-hands work by me and Francesco :)
Todeschino's new clothes, a 4-hands work by me and Francesco :)

 |
| Nouvelle acquisition latine 1673, fol. 49, end of 14th century, Milano. |
Il pourpoint o giubba
All’abito che abbiamo realizzato viene generalmente dato l’altisonante nome francese di pourpoint, termine che deriva probabilmente dal latino perpunctus, “cucito attraverso”, derivato dalla trapuntatura che lo caratterizza (ulteriori dettagli nell’articolo di Tasha Kelly). Attestato con questo nome anche negli inventari trecenteschi in francese di casa Savoia (Pisetzky II, 33), questo capo di abbigliamento ha in Italia nomi diversi: lo si può trovare indicato come “farsetto” soprattutto in area toscana, in riferimento alla farsa, cioè all’imbottitura, che lo caratterizza, mentre nell’Italia settentrionale è più spesso chiamato “zuppa”, “zupparello”, “giubba”. Volendo individuare una ulteriore sfumatura terminologica, sembra che i farsetti siano spesso bianchi, realizzati con panno di cotone o misto, raramente indossati a vista in quanto considerati un capo intimo, mentre le giubbe sono spesso realizzate in materiali più pregiati, serici, cioè sciamito, zetanino, velluto o più spesso zendado (Pisetsky II, 33s.). La nostra “giubba” dunque è un capo maschile piuttosto ricco, diffuso in tutto il ‘300, caratterizzato da un’imbottitura solitamente di bambagia che sottolinea la figura con il petto pronunciato tipica del Trecento, ed è l’indumento al quale si attaccano le calzabraghe.


Guiron le Courtois, Milano, 1380-1390.
The pourpoint or "giubba"
The garment we realized is usually called with the ranting name of pourpoint, a name that probably comes from the latin perpunctus, “pierced through”, due to its typical quilting (see Tasha Kelly’s article for more details). Attested with this name also in 14th century inventories of House Savoia (Pisetzky II, 33), written in French, in Italy this garment has different names: it’s called "farsetto" mainly in Tuscany, reffering to the "farsa", i.e. the padding material, while in Northern Italy it’s more often called “zuppa”, “zupparello”, “giubba”. Searching for a more specifical meaning for this words, it seems like "farsetti" were more often white, made in cotton fabric or mixed fabric (linen/cotton), rarely worn on-sight because they were considered undergarments, while "giubbe" where usually realized in expensive materials, i.e. different kinds of silks, like "sciamito", "zetanino", velvet, or, the most common, "zendado" (Pisetzky II, 33s). So our “giubba” is a quite rich male garment to which the hoses were fastened, used through the whole 14th century, usually padded with cotton tow to emphasize the dove-like male chest, so appreciated in that period.
 Il modello, i materiali e la realizzazione
Non essendomi mai confrontata con una sfida del genere, non me la sono sentita di progettare un pourpoint partendo da zero: abbiamo allora deciso di acquistare il libro di Tasha Kelly sul pourpoint di Charles de Blois, nel quale, oltre a una descrizione dettagliata dei passaggi da seguire, si trova anche il prezioso cartamodello. Una volta realizzato il provino e fatti i necessari aggiustamenti, abbiamo lasciato qualche centimetro di margine per l’imbottitura: se volete fare un calcolo più preciso, guardate qui. Abbiamo poi tagliato i singoli tessuti, sovrapposto tutti i pezzi e iniziato il lavoro di trapuntatura, prima di cucire insieme le parti. L’imbottitura è costituita da un solo strato di bambagia su tutto il corpo, mentre è doppia sul petto.
I materiali:
- lino bianco per fodera del pourpoint
- bambagia per l’imbottitura: dal reperto e dai molti statuti dei farsettai risulta che l’imbottitura dovesse essere fatta principalmente utilizzando proprio la fibra grezza del cotone.
- seta per l’esterno: è seta sottile con tessitura piana, con trama gialla (con fili più spessi) e ordito bordeaux, con circa 36-40 fili/cm: le caratteristiche della seta sono simili a quelle riscontrabili in alcuni dei reperti di Londra.
Le cuciture interne sono realizzate in filo di lino bianco, mentre quelle visibili in filo di seta.

The model, the materials and the process
Since I never undertook such a challenge, I decided not to start the tailoring from the beginning. We bought Tasha Kelly’s book about Charles de Blois pourpoint, which features the instructions and a really good pattern. We realized the toile, made some adjustments and left some extra fabric for the padding: if you want to know exactly how much fabric you have to leave, see here. We cut the different fabrics and padded them all together. The padding consists in 1 layer of cotton tow over all the body, while it’s 2 layers on the chest.
The materials:
- White linen for the lining
- Cotton tow for the padding: from the original finds and many rules of the "farsettai" (doublet makers) guilds in Italy it’s known that cotton tow had to be used for the quilting.
- Silk for the outer layer. It’s a thin tabby silk, with a yellow warp (with thicker threads) and a Bordeaux weft, with about 36-40 threads/cm: the features of this silk are quite similar to some of the findings from London.
The inner seams are made in white linen, while the visible ones are in silk.


 Bottoni speciali
I bottoni del pourpoint di Charles de Blois sono in stoffa o in legno ricoperto, ma per questo aspetto ci siamo distaccati dal modello, e per “semplificarci la vita”, abbiamo realizzato i bottoni noi stessi, grazie alla progettazione e sotto la guida di Nicola Tonelli di “Il Gatto e la Volpe”. A vederli, sembrano bottoni normali, ma la caratteristica che li rende speciali è che sono cavi: nascono infatti da due semisfere di lastra di bronzo, saldate insieme e completate dal gambo. Questa tipologia di bottone, anche se poco riprodotta nel mondo della rievocazione, sembra essere molto diffusa in Italia, come confermano anche alcuni ritrovamenti basso-medievali della nostra area. Nonostante i tempi di produzione siano molto più lunghi di quelli richiesti dai normali bottoni a fusione, permettono un notevole risparmio di materiale e hanno anche il vantaggio di non appesantire l’abito (ognuno dei nostri bottoni pesa meno di 1g). Sul pourpoint ne abbiamo messi 85.
Special buttons


Charles de Blois original buttons are made in fabric or have a wood core, but we decided to make them in a different way. To “make our life easier”, we made the metal buttons ourselves, thanks to the project and support of Nicola Tonelli from “Il Gatto e la Volpe” . If you only look at them, they look like normal buttons, but their special feature is that they’re hollow: they are made from 2 hemispheres of bronze sheet, soldered together and completed with the loop. This kind of button, even if it’s not popular in the living history world, is very common in Italy, as some local late medieval finds from our area confirm. Despite the production time, that’s really longer than casted buttons, they allow to save a lot of material and don’t add much weight to the garment (every button weights less than 1g). On the pourpoint there are 85 of them!


 Le calzabraghe
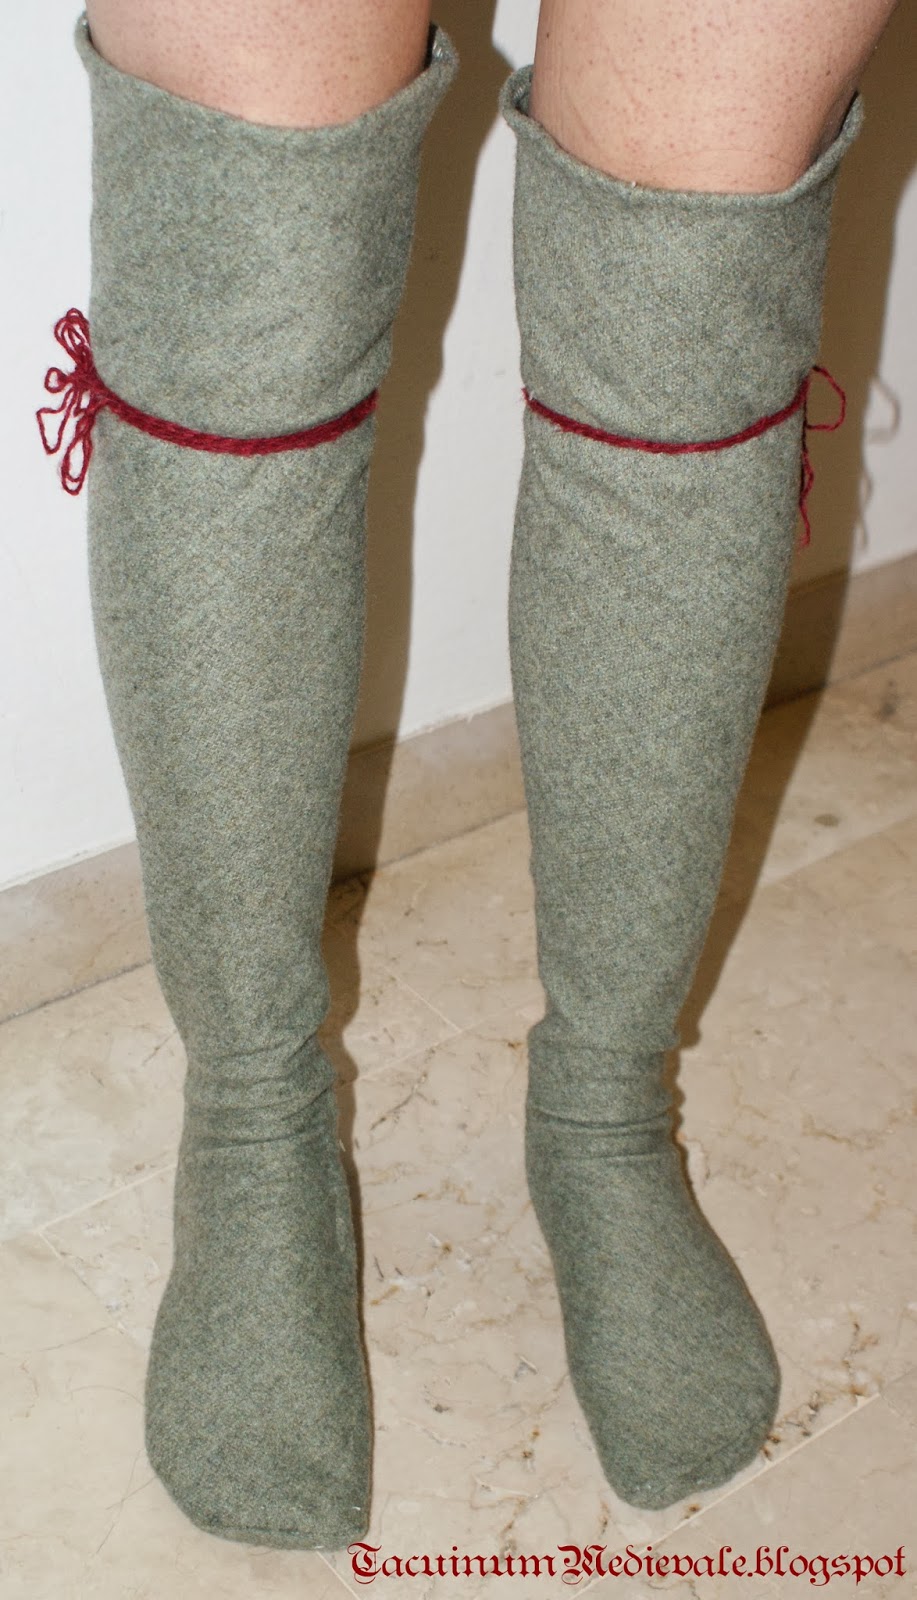
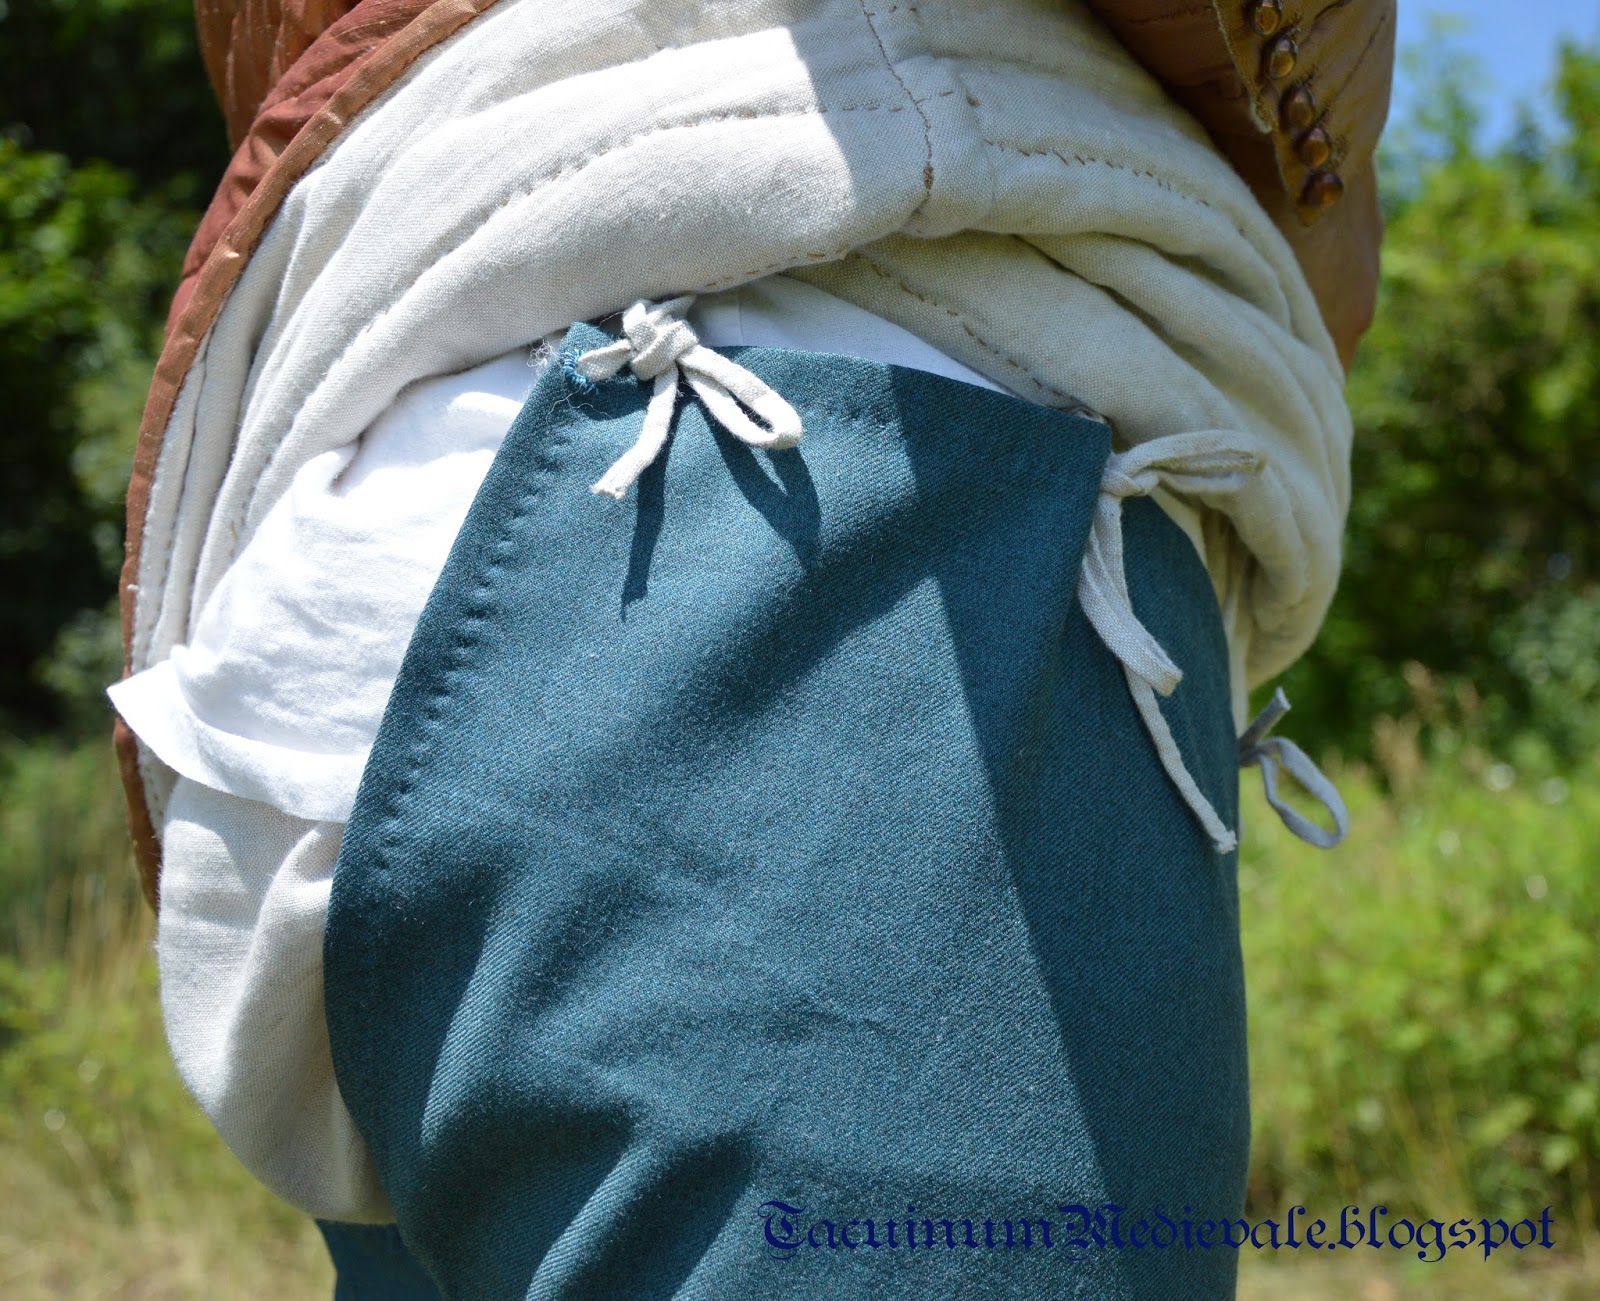
All’interno del pourpoint originale sono ancora visibili i lacci ai quali erano attaccate le calzabraghe: sono 3 per ogni lato più 1 laccio al centro della schiena di cui non abbiamo capito precisamente lo scopo (forse serviva a tenere ferme al centro le due calzabraghe?). Nonostante l’idea iniziale fosse quella di rispettare la stessa posizione dei lacci dell’originale, non siamo riusciti a riprodurla fedelmente e le nostre calzabraghe quindi non coprono che parzialmente il sedere, mentre, a giudicare dai lacci, quelle indossate da Charles de Blois dovevano coprirlo quasi interamente. Un aspetto che ritenevo importante era che tra il pourpoint, corto per sua natura, e le calzabraghe non fossero visibili le braghe, dal momento che sono spesso a vista nelle ricostruzioni ma quasi del tutto assenti nelle fonti iconografiche. Ritengo che le critiche dei moralisti dell’epoca rivolte a queste “braghe” a vista siano più che altro da intendere come critica all’accorciarsi progressivo delle vesti a cui si assistè nella seconda metà del secolo, ma non ritengo che le braghe a vista fossero di per sè un elemento apprezzato, data la loro quasi completa assenza nell’iconografia (quando sono presenti inoltre identificano personaggi poveri, con gli abiti laceri). Per ottenere la massima aderenza possibile della calzabraga alla gamba, abbiamo tagliato la lana di sbieco, ma non essendo sufficientemente elastica abbiamo dovuto lasciare aperta la cucitura della parte inferiore del polpaccio, che viene dunque cucita ogni volta che le si indossa: pur non essendo una soluzione ottimale, non ci è sembrata del tutto improbabile, dal momento che la cucitura non è un processo così lungo come potrebbe sembrare (non più di un paio di minuti) e che alcuni reperti della Groenlandia presentano comunque un’apertura dietro la caviglia, probabilmente per facilitare il passaggio del tallone. In ogni caso, molto probabilmente questo stratagemma può essere evitato utilizzando un twill o una lana più cedevole. La forma del piede è basata sui reperti di Londra e su alcune fonti italiane.
 Hoses
Hoses
Inside the original pourpoint are still visible the laces used to fasten the hoses: there are 3 on each side plus 1 in the middle of the back (we are not sure about its purpose, but maybe it was used to fasten both hoses together in the middle?). Despite the first aim was to reproduce the original placing of the original garment, we didn’t manage to and our hoses only cover the bottom partially, while, considering the placing of the original laces, Charles’ hoses must have covered his bottom almost completely. I wanted the braies not to be visible when wearing the short pourpoint and hoses: you can often see them during the living history events, but are never shown in pictures. I believe that the moralists who criticized these “visible braies” should be considered as a critic towards the upper clothes becoming shorter and shorter during the 2nd half of the century, but I don’t believe visible braies were themselves an appreciated element of fashion, since they are almost completely absent from sources (and also when they are shown they identify poor characters in rags). To have the hoses as fitted as possibile, we cut the fabric on the bias, but since it wasn’t enough stretchy we had to leave the seam open in the lower part of the calf, that is therefore sewn-on every time they are worn: even if it’s not the perfect solution, it didn’t seem completely impossible to us, since the sewing only requires a couple of minutes and some of the Greenland finds show an opening behind the ankle, probably to help the heel pass trough. Anyway, this opening would probably be unnecessary using a twill or a more elastic wool. The shape of the foot is based on the finds from London and some Italian sources.
 |
| Le scarpe sono di Graziano Dal Barco / The shoes are made by Graziano dal Barco |
Riferimenti e articoli correlati / References and related articles
Tasha Kelly:
Il libro di Tasha Kelly “The Pourpoint of Charles de Blois” / Tasha Kelly’s book “The Pourpoint of Charles de Blois”
Altro / Other
La pagina dedicata a Todeschino sul nostro sito / The page about Todeschino in our website
La pagina dedicata a Todeschino sul nostro sito / The page about Todeschino in our website
Forum con discussione sulle calzabraghe e come evitare le braghe “a pannolone” / Forum with discussion about hoses and how to avoid “diaper look”.
“Il Gatto e la Volpe”, riproduzioni storiche di oggetti metallici / “Il Gatto e la Volpe”, historical reproductions of metal items