giovedì 24 settembre 2015

Un banco da falegname del XIV secolo / A14th century carpenter's workbench

Questo post non tratta cucito, ma è legato all’attività artigianale di Francesco, la falegnameria.
This post is not about sewing, but it talks about Francesco’s craft, woodworking. 
… and we really hope our English will be understandable even if we don’t know very well specific words.
Banco da lavoro / Workbench

La descrizione del banco / The description of the workbench
L’oggetto in questione è composto da due assi in castagno bloccate assieme tramite due pioli e da due traversi inchiodati e forati; nei fori sono poi inserite le gambe del banco fatte in legno di nocciolo. Per facilitare il trasporto con i nostri mezzi, due gambe sono estraibili mentre due sono fisse.
Per fissare le assi o la legna sul banco, sono stati realizzati due tipi di fermi: 4 sono in ferro battuto in forgia mentre due in legno sono stati fatti al tornio (storico).
I pioli in ferro hanno una parte appiattita in modo da potersi incastrare ancora meglio al legno. Tutti i fermi hanno lo stesso diametro di circa 1,6 cm e  possono essere inseriti nei vari fori realizzati sul banco; sicuramente ne saranno fatti altri per poter utilizzare diverse misure di assi grezze.

The workbench is made with 2 boards in chestnut, placed side by side and fixed together with 2 rods and 2 nailed transverse planks with holes, in which are put the legs of the workbench made in hazel. To make it easier to move with our car, 2 legs can be took off while the other 2 are secured.
To block the planks or the wood on the workbench, I realized 2 different kind of rods: 4 are in forged iron while 2 are in turned wood. The iron rods have a flattened part, useful to secure better the planks. All the rods have the same diameter (about 1,6 cm) and can be inserted in the different holes made on the workbench: I will make more of them so I can work with different sizes of planks. 


Le fonti / Sources
L’iconografia riportante questo tipo di strumento copre diversi secoli (XIV-XVI sec.) nonostante alternative al banco siano spesso utilizzate specialmente quando l’asse era molto lunga: un paio di cavalletti erano decisamente più comodi, così come due pali scavati erano sicuramente più versatili e adattabili a diversi tipi di tavole o assi.

Français 2092, fol. 75v, Construction de Saint-Denis-de-l'Estrée
Latin 511, fol. 5, Construction du Temple
The sources showing this kind of tool are spread through many centuries (14th – 16th century), despite there are different options, expecially when the boards were very long: a couple of sawhorses are definetly more convenient, and also 2 poles with slots are more adaptable to different dimensions of boards and planks. 


1423,Noah building the Ark in the Bedford Hours, British Library, London, UK. Manuscript Add. MS 18850, folio15v


1461,Spanish Book of Hours,The British Library,
London, UK. Manuscript Add. 18193, folio 48v
Utilizzo del banco
Per lavorazioni di assi più piccole questo tipo di banco risulta indispensabile poichè non è possibile fissare i pezzi di legno più corti su due cavalletti, che devono essere un minimo distanti tra loro, mentre con il banco si possono facilmente tenere fermi, realizzando pioli più bassi  o spessori per alzare la tavola da lavorare alla giusta altezza e fissarla senza troppa difficoltà.
Hausbuch der Mendelschen
Zwölfbrüderstiftung, Band 1. Nürnberg
1426–1549. Stadtbibliothek Nürnberg,
Amb. 317.2°
Vediamo quindi come questo banco, realizzato in piccole dimensioni, si possa collocare in un ambiente “casalingo” o comunque chiuso, ma  possa anche essere usato, se di dimensione adeguata, nei grandi cantieri, luoghi in cui le altre soluzioni trovano quasi esclusivamente il loro impiego.

To work on smaller pieces this kind of workbench is necessary, because it’s not possible to secure shorter planks on 2 sawhorses, that have to be at least a little far from each other, while with the workbench they can be easily secured, making shorter rods or shims to lift the plank and easily fix it.
We can see that this workbench, which is made in small scale, can be used in a “domestic” or closed setting, but it can also be used, if it’s in an adequate dimension, in big building sites, places where the other tools are most commonly used. 


1390, Pietro di Puccio, campo-santo Pisa


sabato 12 settembre 2015

Seta e perle per Damisella / Silk and pearls for Damisella

Questo abito e i suoi accessori sono stati progettati e realizzati per ricostruire il personaggio storico di Damisella Gonzaga, ultima figlia di Luigi Gonzaga, primo capitano del popolo di Mantova: andò sposa a Alidosio Alidosi, detto il Todeschino, il 10 febbraio 1367, portando una cospicua dote, all’altezza della fama e della ricchezza della sua famiglia di origine.

This dress and its accessories have been planned and realized to re-enact the historical character of Damisella Gonzaga, last daughter of Luigi Gonzaga, captain of Mantua: she married Alidosio Alidosi, called the Todeschino, the 10th of February 1367, bringing a conspicuous dowry, up to the reputation and wealth of her family.


Di fronte al Castello San Giorgio di Mantova: "Damisella" è tornata a casa per un giorno.
In front of the Castle of Saint George in Mantova: "Damisella" is back home for a day. 
I materiali
La protagonista dell’abito è sicuramente la seta verde: si tratta di una seta dupioni, venduta come tessuta a mano,  che ho acquistato un paio di anni fa. Dal momento che la seta era troppo sottile e non cadeva bene, dopo molte indecisioni ho deciso di foderare il corpo e la gonna in lana, in modo che desse peso all’abito. Le maniche sono invece state foderate di lino, per non aggiungere troppo spessore e anche perché, indossandolo con la camisa supportiva senza maniche, non volevo avere la lana a diretto contatto con le braccia: la fodera in lino delle maniche sembra essere attestata anche nella “gonna d’oro” della regina Margareta di Danimarca, che presenta anche una fodera di lino sul busto, estesa anche per 40-50 centimeti della gonna.  Per rifinire la scollatura e darle maggiore robustezza ho usato una sottile striscia di taffetà: finiture analoghe sono testimoniate anche da alcuni frammenti di Londra (Textiles and Clothing 1150- 1450, 158s.). Tutte le cuciture sono fatte a mano: quelle esterne in  filo di seta, le cuciture della fodera di lino.
NOTA: la seta tessuta a dupioni probabilmente non è la scelta migliore: suggerirei invece di usare taffetà di seta. 


The materials
Allacciatura laterale a spirale. /
Side spiral lacing.
The protagonist of this dress is for sure the green silk: it’s a dupioni silk which was sold as “hand woven”, and I bought it a couple of years ago. Since the silk was too thin and didn’t fall in a proper way, I decided to line the bodice and gown in wool, in order to get more weight. The sleeves have been lined in linen, to avoid too much thickness and to avoid direct contact with wool on the arms, since I wear this dress with the sleeveless supportive underwear.  The linen lining in sleeves seems to be present also in the “golden gown” of Queen Margareta of Denmark, that is also lined in the bodice and in the gown for 40-50 cm.The neckline has a narrow silk facing in taffeta to strengthen it, according to some finds from London (Textiles and Clothing 1150- 1450, 158s.). All the dress is hand sewn: the external seams are in silk, the ones of the lining are in linen.
NOTE: dupioni silk is probably not the best choice. I would recommend to use silk taffeta instead. 


Nouvelle acquisition latine 1673, fol. 8:
raccolta dei fichi / harvesting figs.
Il modello
Il modello non è la riproduzione fedele di nessuno dei reperti esistenti: si basa in parte sulla “gonna d’oro”, in particolare per la divisione in quattro quarti del davanti e del dietro e per la scelta di non dare forma rettangolare ma trapezoidale a queste parti, richiamando la forma dell’originale, ma si differenzia per la presenza di 4 gheroni che partono dall’altezza dei fianchi, 2 frontali e 2 laterali, necessari per raggiungere l’ampiezza voluta (3.5 m). Le maniche sono ricavate da un’unico pezzo, senza l’inserimento di gheroni, e sul polso hanno la forma “a campanella”, comune per gli abiti ricchi del periodo: non possono mancare i bottoni, 15 per ogni manica. Alcuni dettagli sono stati scelti per renderlo il più coerente possibile con la moda italiana: 
- la scollatura abbastanza pronunciata e rotonda (avrei potuto osare di più e renderla più a barca, ma non volevo rinunciare ad avere il supporto sulle spalle, a causa del peso del vesitito: per una bella analisi sulle scollature, La Cotte Simple );
- l’allacciatura laterale, testimoniata da alcune fonti iconografiche. Per avere una buona chiusura dell’abito, suggerisco di utilizzare un’allacciatura a spirale, testimoniata nelle fonti (a differenza dell’allacciatura a “x”) e molto efficace. Qui “The Zen of Spiral Lacing”  e qui l’articolo di Tasha Kelly. Il cordino è lungo 3 metri, per non doverlo sfilare e infilare ogni volta, ed è tessuto con filo di seta per le asole, con 4 tavolette. Grazie a Mervi per le istruzioni!
Il toile su cui si basa il vestito è quello fatto durante il workshop di cucito.
L’abito è un “primo strato”, da indossare quindi sopra la biancheria intima, al quale spero di aggiungere il prossimo anno un secondo strato sufficientemente ricco.

Dettaglio del cordino dell'allacciatura. /
Detail of the string of the side lacing.
The model
The model is not the faithful replica of any existant garment: it’s partly based on the “golden gown”, expecially for the division in 4 parts of the front and back and for the choice to give a trapezoidal shape instead of a rectangular one to these parts, more like the original, but it’s different because of the 4 hip-heigh gores I needed to have a proper hem size (3.5 m). The sleeves are made in a single piece, without inserting any gore, and have the “bell shape” common in some rich garments of the period: of course there are buttons, 15 for each sleeve. Some details have been chosen to match the Italian fashion best:
- the deep, rounded neckline (I could have dared more and made it more boat-like, but I wanted to have support on the shoulders because of the weight of the dress. For a nice analysis of necklines ,La Cotte Simple ) 
- the side lacing, as shown in some Italian pictures. To have a good lacing, I really suggest to use the spiral lacing, which is portrayed in the sources (the “x” lacing is not) and very effective. Check out the “Zen of spiral lacing” and here a nice article by Tasha Kelly about lacing. The string, which is 3 meters long so I don't have to insert and take it away every time, is tablet woven with 4 tablets, and it's made in buttonholes silk. Thanks to Mervi for the instructions!
The toile I used is the one we made during the medieval sewing workshop I organized in February. 
This dress is a “first layer”, to be worn over the underwear, and I hope I will give it a proper second layer next year. 


1369, Oratorio di S. Stefano, Lentate sul Seveso. Le fanciulle,
figlie della famiglia Porro rappresentata nell'atto di donare
l'oratorio, hanno maniche a campanella e, guardando
attentamente, si vede che indossano anelli nell'indice e nell'
anulare. / 1369, Oratorio of S. Stefano, Lentate sul Seveso.
The young ladies are daughters of the Porro family, portrayed
when donating the oratory. They have bell-shaped sleeves and,
looking carefully, you can see they wear rings in index and
ring finger.


Gli accessori
Un abito non è abbastanza per creare un’immagine coerente di un personaggio, quindi ho cercato di aggiungere anche alcuni accessori per arricchire l’insieme. 
The accessories
A dress is not enough to create a coherent portrait of a character, so I looked for some accessories to improve the ensemble.

- Collana di perle e corallo
Missale et Horae ad usum
 Fratrum Minorum
(1385- 90, BNF Latin 757, 258v.) Fanciulla
con terzolla e collana. / A lady with
a "terzolla" and necklace.
Nelle fonti italiane, e molto meno in quelle straniere che mi è capitato di vedere, ricorrono collane di varie forme: sono le fonti documentarie però a venirci in aiuto informandoci sulle pietre preziose più usate. Io ho scelto corallo (madrepora) e perle, sia perché facilmente distinguibili anche nelle miniature, come quelle dei Tacuina Sanitatis, sia perché esplicitamente menzionati in un documento imolese del 1391, contenete la stima della dote di nozze di Rengarda Alidosi, figlia di Beltrando: «Item una collana di perle facta a poste con coragli in mezo in fili bianchi de seda che pesa onze 2 ½, estimat ducati 30». 
- Necklace in pearls and corals
In the Italian sources, and a lot less in foreign ones I stumbled upon, there are a lot of different necklaces: the written sources can tell us more about the most common gems in use. I decided to use coral (actually madrepore) and pearls, because they can be clearly seen in miniatures, like the ones from Tacuina Sanitatis, and also because they are mentioned in a document from Imola dated 1391, that includes the valuation of the dowry of Rengarda Alidosi, daughter of Beltrando: “A necklace of pearls, made for this occasion, with corals in the middle, on white silk threads: it weights 2 ½ ounces, it worths 30 ducats”. 

- Anelli
Spesso menzionati negli inventari e nelle leggi suntuarie, dovevano essere un accessorio particolarmente apprezzato e diffuso. I due di cui dispongo al momento sono realizzati da Il Gatto e la Volpe sulla base di originali romagnoli: uno è in bronzo e granato, l’altro in argento e smeraldo. 
- Rings
Often mentioned in inventories and sumptuary laws, rings must have been very common and appreciated. The two I have now are made by Il Gatto e la Volpe, after some originals from Romagna: one is in bronze and garnet, the other one in silver and emerald.


- La terzolla: un’ipotesi e un tentativo
La vera impresa di questo outfit è stata l’acconciatura. Da tempo desideravo cercare di ricostruire la misteriosa “terzolla”, copricapo che la Muzzarelli (Guardaroba Medievale, p. 361) definisce «acconciatura a ornamento del capo, così detta perchè fatta con 300 perle» e probabilmente a volte chiamata semplicemente dalle fonti “ghirlanda” o “ghirlanda con perle”. Non ho mai trovato il nome “terzolla” associato da autorevoli studiosi a qualche immagine, ma ho provato a ipotizzare che esempi di questo prezioso copricapo si possano trovare sia in alcune immagini del Missale et Horae ad usum Fratrum Minorum (1385- 90, Nord Italia, Bibliothèque nationale de France, Département des manuscrits, Latin 757) sia in Queste del Saint Graal Tristan de Léonois (1380-1385, Milano, BNF Français 343). Mi sono concentrata sul libro d’ore: dalle immagini mi sembrava di capire con sicurezza che sotto le perle si trovassero due ciocche di capelli, non intrecciati, che si incrociavano sulla fronte, cingendo il viso in modo da coprire le orecchie. Le perle inoltre apparivano separate da spazi regolari, formando delle piccole file, e apparivano semplicemente sospese sui capelli, senza particolari strutture a sostenerle. La prima, ingenua ipotesi che si è subito rivelata fallimentare è stata realizzare semplici file di perle da posare sui capelli, ma in questo modo veniva meno la regolarità mostrata dalla miniatura ed erano estremamente precarie. Serviva qualcosa di fisso a cui attaccarle: una retina. 
1380-1385 BNF Français 343 Queste del Saint Graal
Tristan de Léonois Folio 59. Un altro esempio di terzolla. /
Another source for a terzolla. 
Le retine conservate (cf. Textiles and Clothing 145-149) sembrano essere sempre circolari, ma ho pensato che una retina lunga e stretta che contenesse i capelli si potesse comunque adattare alle mie necessità: facendola di seta scura, di un colore simile a quello dei miei capelli, avrei potuto renderla praticamente invisibile, e il risultato sarebbe stato molto simile alla miniatura. Fatti circa 70 cm di retina, è stato il momento di attaccare le perle: 550 perline di 3-4 mm. Risultano essere quasi il doppio rispetto alle 300 che sembrano dare il nome alla terzolla: probabilmente un maggiore spazio tra le file di perle avrebbe permesso di avvicinarsi al numero ipotetico previsto e di creare file di perle più distinguibili, ma con 38 gradi di temperatura e una settimana per completarla prima di partire per Azincourt non ho avuto cuore e tempo di rimaneggiarla. L’ultimo problema da risolvere era la difficoltà di tenere ferma la retina sulle due ciocche di capelli che, dovendo coprire le orecchie, non potevano essere cucite tutto intorno alla testa.
Alla fine la soluzione è stata cucire dietro alla retina una striscia di tessuto nero, che si potesse facilmente nascondere sotto i capelli scuri, per creare una solida struttura tubolare in cui andare a inserire i capelli (tramite un buco nel tessuto all’altezza della nuca), molto più stabile da fissare grazie a delle spille: grazie di cuore a Nini per il suggerimento! 


Missale et Horae ad usum Fratrum Minorum (1385- 90, BNF Latin 757, 380 r.): la miniatura di riferimento per la terzolla e il risultato finito. / The main reference for the terzolla and the final result. 

 - The “terzolla”: an hypothesis and a try
The really challenging part of this outfit was the headdress. I have been waiting for a long time to reproduce the mysterious “terzolla”, an headdress described by Muzzarelli ((Guardaroba Medievale, p. 361) as a “headdress and decoration for the head, so called because it was made with 300 pearls” (“terzolla” maybe recalls the Italian “trecento”, i. e. 300) and probably called in some sources only “garland” or “garland with pearls”. I never found any authoritative academic who associated this name to a picture, but I thought that maybe some samples of this precious headdress can be found in some pictures from Missale et Horae ad usum Fratrum Minorum (made in 1385- 90 in Northern Italy, Bibliothèque nationale de France, Département des manuscrits, Latin 757) and from Queste del Saint Graal Tristan de Léonois (1380-1385, Milano, BNF Français 343). I focused on the book of hours: from the pictures I would say that clearly under the pearls there were 2 locks of hair, not braided, crossed over the forehead, that framed the face all around, covering the hears too. The pearls seemed to be divided by equal spaces, making small rows, and simply looked suspended over the hair, without any particular structure underneath. The first, naïve try, that immediately became a failure, was making simple rows of pearls to lay over the hair, but this way they weren’t so regularly spaced and very precarious. I needed something fixed and more solid: a hairnet. 
The surviving hairnets (cf. Textiles and Clothing 145-149) are always rounded, but I thought that a long and narrow hairnet that could cover and keep the hair in place would have been suitable for my work: making it in a dark silk thread, a colour that matched my hair, it would have been almost invisible, and the result would have been quite close to the miniature. After netting about 70 cm of hairnet, it was time to sew the pearls: 550 pearls of 3-4 mm each. They are about double the amount that seem to give the name to the “terzolla” (300): probably a bigger spacing between the rows would have worked better, providing an amount of pearls closer to the hypothetical original amount and making more distinguishable rows as well. But there were 38° C in July and only a week to finish it before Azincourt, so I didn’t have the strength or time to change it. 
The last problem I had to solve was to keep the hairnet in place over the locks: since it had to cover the ears, I couldn’t sew it on the head. In the end, the key was to sew behind the hairnet a thin stripe of black fabric, easy to hide under the dark hair locks, to create a tubular structure in which I could put the hair (through a hole in the fabric over the nape): it’s a lot sturdier and easy to fasten using some pins. Thanks a lot to Nini for this suggestion!

Mi riempie di soddisfazione vedere questa foto e sapere finalmente che tutti i vestiti che indossiamo sono stati fatti da noi. / It's really satisfying to look at this picture and finally know that all the clothes we are wearing have been made by us. 


martedì 2 giugno 2015

I vestiti nuovi di Todeschino / Todeschino's new clothes

I vestiti nuovi di Todeschino, un lavoro a 4 mani portato avanti da me e Francesco :)
Todeschino's new clothes, a 4-hands work by me and Francesco :)


Nouvelle acquisition latine 1673, fol. 49,
end of 14th century, Milano. 

Il pourpoint o giubba
All’abito che abbiamo realizzato viene generalmente dato l’altisonante nome francese di pourpoint, termine che deriva probabilmente dal latino perpunctus, “cucito attraverso”, derivato  dalla trapuntatura che lo caratterizza (ulteriori dettagli nell’articolo di Tasha Kelly). Attestato con questo nome anche negli inventari trecenteschi in francese di casa Savoia (Pisetzky II, 33), questo capo di abbigliamento ha in Italia nomi diversi: lo si può trovare indicato come “farsetto” soprattutto in area toscana, in riferimento alla farsa, cioè all’imbottitura, che lo caratterizza, mentre nell’Italia settentrionale è più spesso chiamato “zuppa”, “zupparello”, “giubba”. Volendo individuare una ulteriore sfumatura terminologica, sembra che i farsetti siano spesso bianchi, realizzati con panno di cotone o misto, raramente indossati a vista in quanto considerati un capo intimo, mentre le giubbe sono spesso realizzate in materiali più pregiati, serici, cioè sciamito, zetanino, velluto o più spesso zendado (Pisetsky II, 33s.). La nostra “giubba” dunque è un capo maschile piuttosto ricco, diffuso in tutto il ‘300, caratterizzato da un’imbottitura solitamente di bambagia che sottolinea la figura con il petto pronunciato tipica del Trecento, ed è l’indumento al quale si attaccano le calzabraghe.
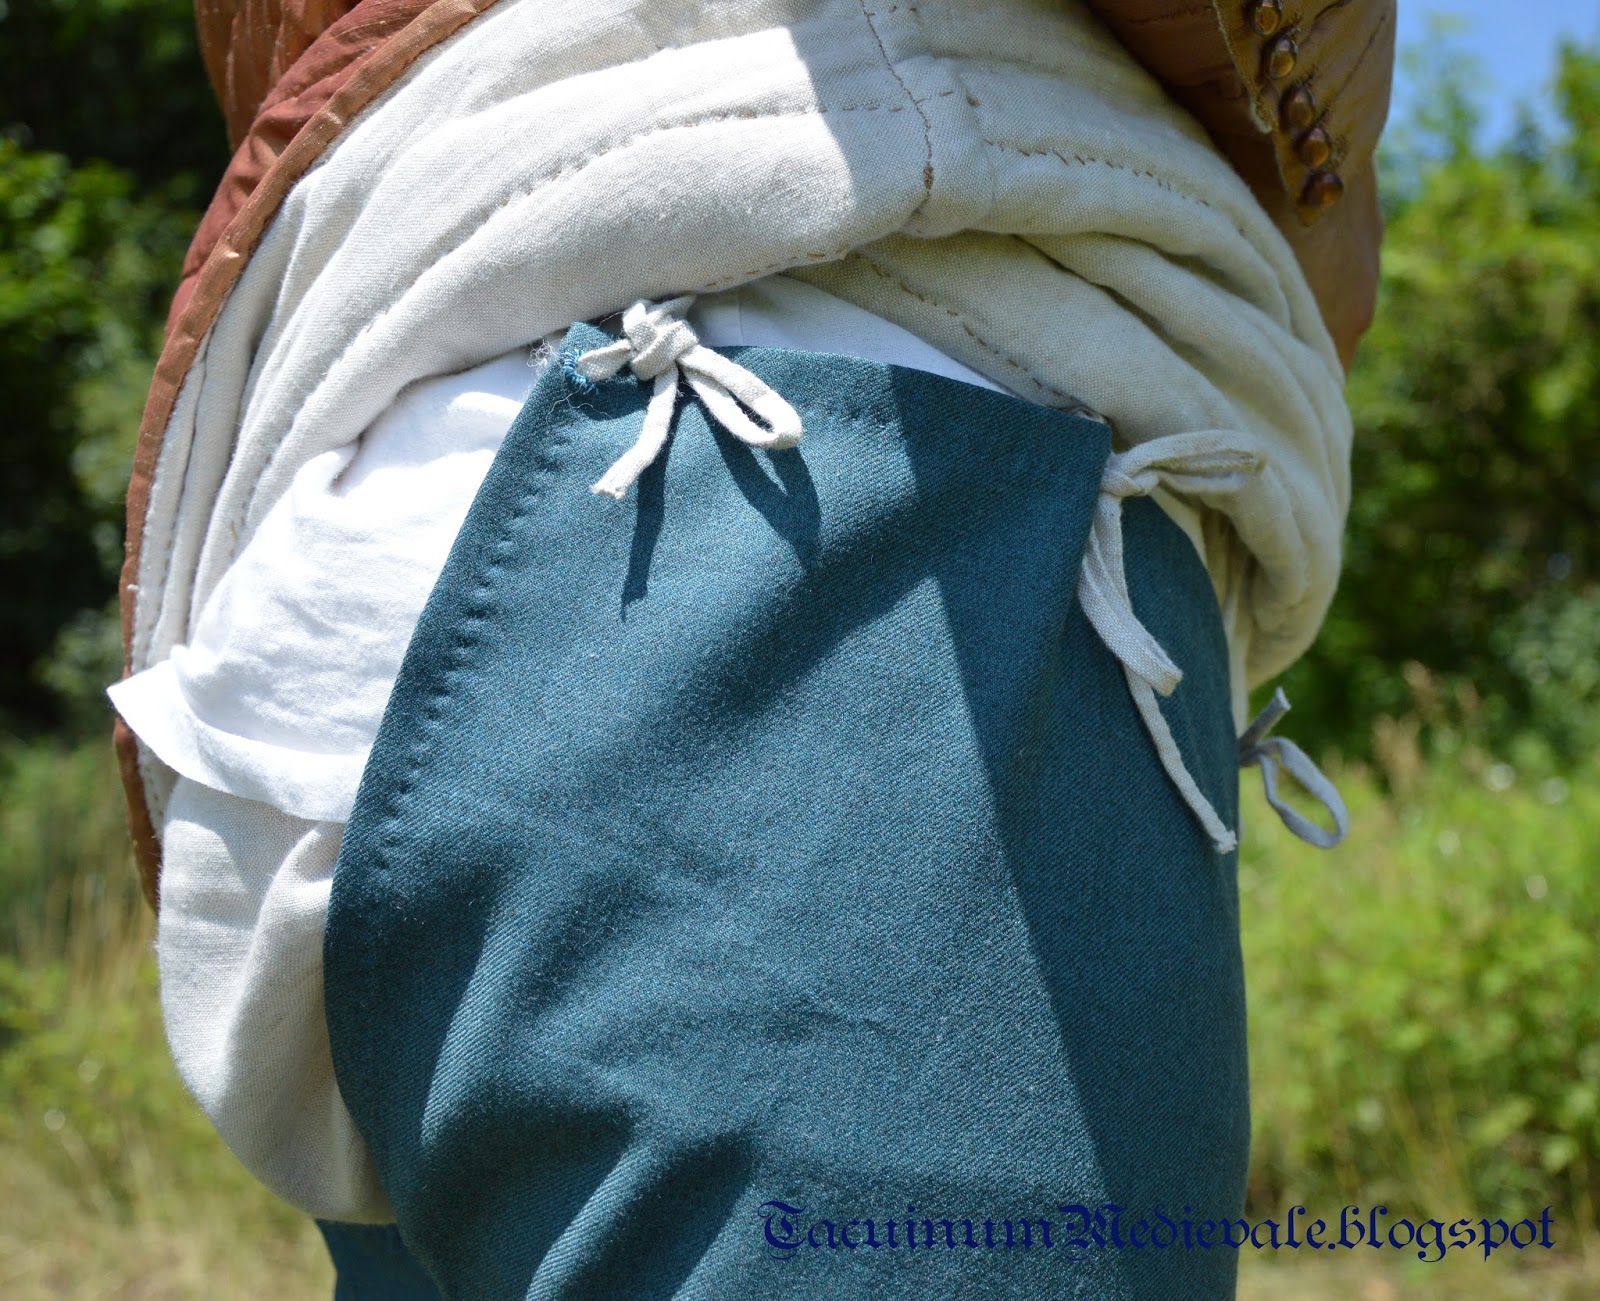
Guiron le Courtois, Milano, 1380-1390. 

The pourpoint or "giubba"
The garment we realized is usually called with the ranting name of
pourpoint, a name that probably comes from the latin perpunctus, “pierced through”, due to its typical quilting (see Tasha Kelly’s article for more details). Attested with this name also in 14th century inventories of House Savoia (Pisetzky II, 33), written in French, in Italy this garment has different names: it’s called "farsetto" mainly in Tuscany, reffering to the "farsa", i.e. the padding material, while in Northern Italy it’s more often called “zuppa”, “zupparello”, “giubba”. Searching for a more specifical meaning for this words, it seems like "farsetti" were more often white, made in cotton fabric or mixed fabric (linen/cotton), rarely worn on-sight because they were considered undergarments, while "giubbe" where usually realized in expensive materials, i.e. different kinds of silks, like "sciamito", "zetanino", velvet, or, the most common, "zendado" (Pisetzky II, 33s). So our “giubba” is a quite rich male garment to which the hoses were fastened, used through the whole 14th century, usually padded with cotton tow to emphasize the dove-like male chest, so appreciated in that period.


Il modello, i materiali e la realizzazione
Non essendomi mai confrontata con una sfida del genere, non me la sono sentita di progettare un pourpoint partendo da zero: abbiamo allora deciso di acquistare il libro di Tasha Kelly sul pourpoint di Charles de Blois, nel quale, oltre a una descrizione dettagliata dei passaggi da seguire, si trova anche il prezioso cartamodello. Una volta realizzato il provino e fatti i necessari aggiustamenti, abbiamo lasciato qualche centimetro di margine per l’imbottitura: se volete fare un calcolo più preciso, guardate qui. Abbiamo poi tagliato i singoli tessuti, sovrapposto tutti i pezzi e iniziato il lavoro di trapuntatura, prima di cucire insieme le parti. L’imbottitura è costituita da un solo strato di bambagia su tutto il corpo, mentre è doppia sul petto.
I materiali:
- lino bianco per fodera del pourpoint
- bambagia per l’imbottitura: dal reperto e dai molti statuti dei farsettai risulta che l’imbottitura dovesse essere fatta principalmente utilizzando proprio la fibra grezza del cotone.
- seta per l’esterno: è seta sottile con tessitura piana, con trama gialla (con fili più spessi) e ordito bordeaux, con circa 36-40 fili/cm: le caratteristiche della seta sono simili a quelle riscontrabili in alcuni dei reperti di Londra. 
Le cuciture interne sono realizzate in filo di lino bianco, mentre quelle visibili in filo di seta.
 

The model, the materials and the process
Since I never undertook such a challenge, I decided not to start the tailoring from the beginning. We bought Tasha Kelly’s book  about Charles de Blois pourpoint, which features the instructions and a really good pattern. We realized the toile, made some adjustments and left some extra fabric for the padding: if you want to know exactly how much fabric you have to leave, see here. We cut the different fabrics and padded them all together. The padding consists in 1 layer of cotton tow over all the body, while it’s 2 layers on the chest. 
The materials:
- White linen for the lining
- Cotton tow for the padding: from the original finds and many rules of the "farsettai" (doublet makers) guilds in Italy it’s known that cotton tow had to be used for the quilting.
- Silk for the outer layer. It’s a thin tabby silk, with a yellow warp (with thicker threads) and a Bordeaux weft, with about 36-40 threads/cm: the features of this silk are quite similar to some of the findings from London.
The inner seams are made in white linen, while the visible ones are in silk. 


Bottoni speciali 
I bottoni del pourpoint di Charles de Blois sono in stoffa o in legno ricoperto, ma per questo aspetto ci siamo distaccati dal modello, e per “semplificarci la vita”, abbiamo realizzato i bottoni noi stessi, grazie alla progettazione e sotto la guida di Nicola Tonelli di “Il Gatto e la Volpe”. A vederli, sembrano bottoni normali, ma la caratteristica che li rende speciali è che sono cavi: nascono infatti da due semisfere di lastra di bronzo, saldate insieme e completate dal gambo. Questa tipologia di bottone, anche se poco riprodotta nel mondo della rievocazione, sembra essere molto diffusa in Italia, come confermano anche alcuni ritrovamenti basso-medievali della nostra area. Nonostante i tempi di produzione siano molto più lunghi di quelli richiesti dai normali bottoni a fusione, permettono un notevole risparmio di materiale e hanno anche il vantaggio di non appesantire l’abito (ognuno dei nostri bottoni pesa meno di 1g). Sul pourpoint ne abbiamo messi 85.

Special buttons
Charles de Blois original buttons are made in fabric or have a wood core, but we decided to make them in a different way. To “make our life easier”, we made the metal buttons ourselves, thanks to the project and support of Nicola Tonelli from “Il Gatto e la Volpe” .  If you only look at them, they look like normal buttons, but their special feature is that they’re hollow: they are made from 2 hemispheres of bronze sheet, soldered together and completed with the loop. This kind of button, even if it’s not popular in the living history world, is very common in Italy, as some local late medieval finds from our area confirm. Despite the production time, that’s really longer than casted buttons, they allow to save a lot of material and don’t add much weight to the garment (every button weights less than 1g). On the pourpoint there are 85 of them! 


Le calzabraghe
All’interno del pourpoint originale sono ancora visibili i lacci ai quali erano attaccate le calzabraghe: sono 3 per ogni lato più 1 laccio al centro della schiena di cui non abbiamo capito precisamente lo scopo (forse serviva a tenere ferme al centro le due calzabraghe?). Nonostante l’idea iniziale fosse quella di rispettare la stessa posizione dei lacci dell’originale, non siamo riusciti a riprodurla fedelmente e le nostre calzabraghe quindi non coprono che parzialmente il sedere, mentre, a giudicare dai lacci, quelle indossate da Charles de Blois dovevano coprirlo quasi interamente. Un aspetto che ritenevo importante era che tra il pourpoint, corto per sua natura, e le calzabraghe non fossero visibili le braghe, dal momento che sono spesso a vista nelle ricostruzioni ma quasi del tutto assenti nelle fonti iconografiche. Ritengo che le critiche dei moralisti dell’epoca rivolte a queste “braghe” a vista siano più che altro da intendere come critica all’accorciarsi progressivo delle vesti a cui si assistè nella seconda metà del secolo, ma non ritengo che le braghe a vista fossero di per sè un elemento apprezzato, data la loro quasi completa assenza nell’iconografia (quando sono presenti inoltre identificano personaggi poveri, con gli abiti laceri). Per ottenere la massima aderenza possibile della calzabraga alla gamba, abbiamo tagliato la lana di sbieco, ma non essendo sufficientemente elastica abbiamo dovuto lasciare aperta la cucitura della parte inferiore del polpaccio, che viene dunque cucita ogni volta che le si indossa: pur non essendo una soluzione ottimale, non ci è sembrata del tutto improbabile, dal momento che la cucitura non è un processo così lungo come potrebbe sembrare (non più di un paio di minuti) e che alcuni reperti della Groenlandia presentano comunque un’apertura dietro la caviglia, probabilmente per facilitare il passaggio del tallone. In ogni caso, molto probabilmente questo stratagemma può essere evitato utilizzando un twill o una lana più cedevole. La forma del piede è basata sui reperti di Londra e su alcune fonti italiane.


Hoses
Inside the original pourpoint are still visible the laces used to fasten the hoses: there are 3 on each side plus 1 in the middle of the back (we are not sure about its purpose, but maybe it was used to fasten both hoses together in the middle?). Despite the first aim was to reproduce the original placing of the original garment, we didn’t manage to and our hoses only cover the bottom partially, while, considering the placing of the original laces, Charles’ hoses must have covered his bottom almost completely. I wanted the braies not to be visible when wearing the short pourpoint and hoses: you can often see them during the living history events, but are never shown in pictures. I believe that the moralists who criticized these “visible braies” should be considered as a critic towards the upper clothes becoming shorter and shorter during the 2nd half of the century, but I don’t believe visible braies were themselves an appreciated element of fashion, since they are almost completely absent from sources (and also when they are shown they identify poor characters in rags). To have the hoses as fitted as possibile, we cut the fabric on the bias, but since it wasn’t enough stretchy we had to leave the seam open in the lower part of the calf, that is therefore sewn-on every time they are worn: even if it’s not the perfect solution, it didn’t seem completely impossible to us, since the sewing only requires a couple of minutes and some of the Greenland finds show an opening behind the ankle, probably to help the heel pass trough. Anyway, this opening would probably be unnecessary using a twill or a more elastic wool. The shape of the foot is based on the finds from London and some Italian sources. 

Le scarpe sono di Graziano Dal Barco / The shoes are made by Graziano dal Barco 


 Riferimenti e articoli correlati / References and related articles

Tasha Kelly:
Il libro di Tasha Kelly “The Pourpoint of Charles de Blois” / Tasha Kelly’s book “The Pourpoint of Charles de Blois” 

Altro / Other
La pagina dedicata a Todeschino sul nostro sito / The page about Todeschino in our website
Forum con discussione sulle calzabraghe e come evitare le braghe “a pannolone” / Forum with discussion about hoses and how to avoid “diaper look”.
“Il Gatto e la Volpe”, riproduzioni storiche di oggetti metallici / “Il Gatto e la Volpe”, historical reproductions of metal items 


domenica 15 marzo 2015

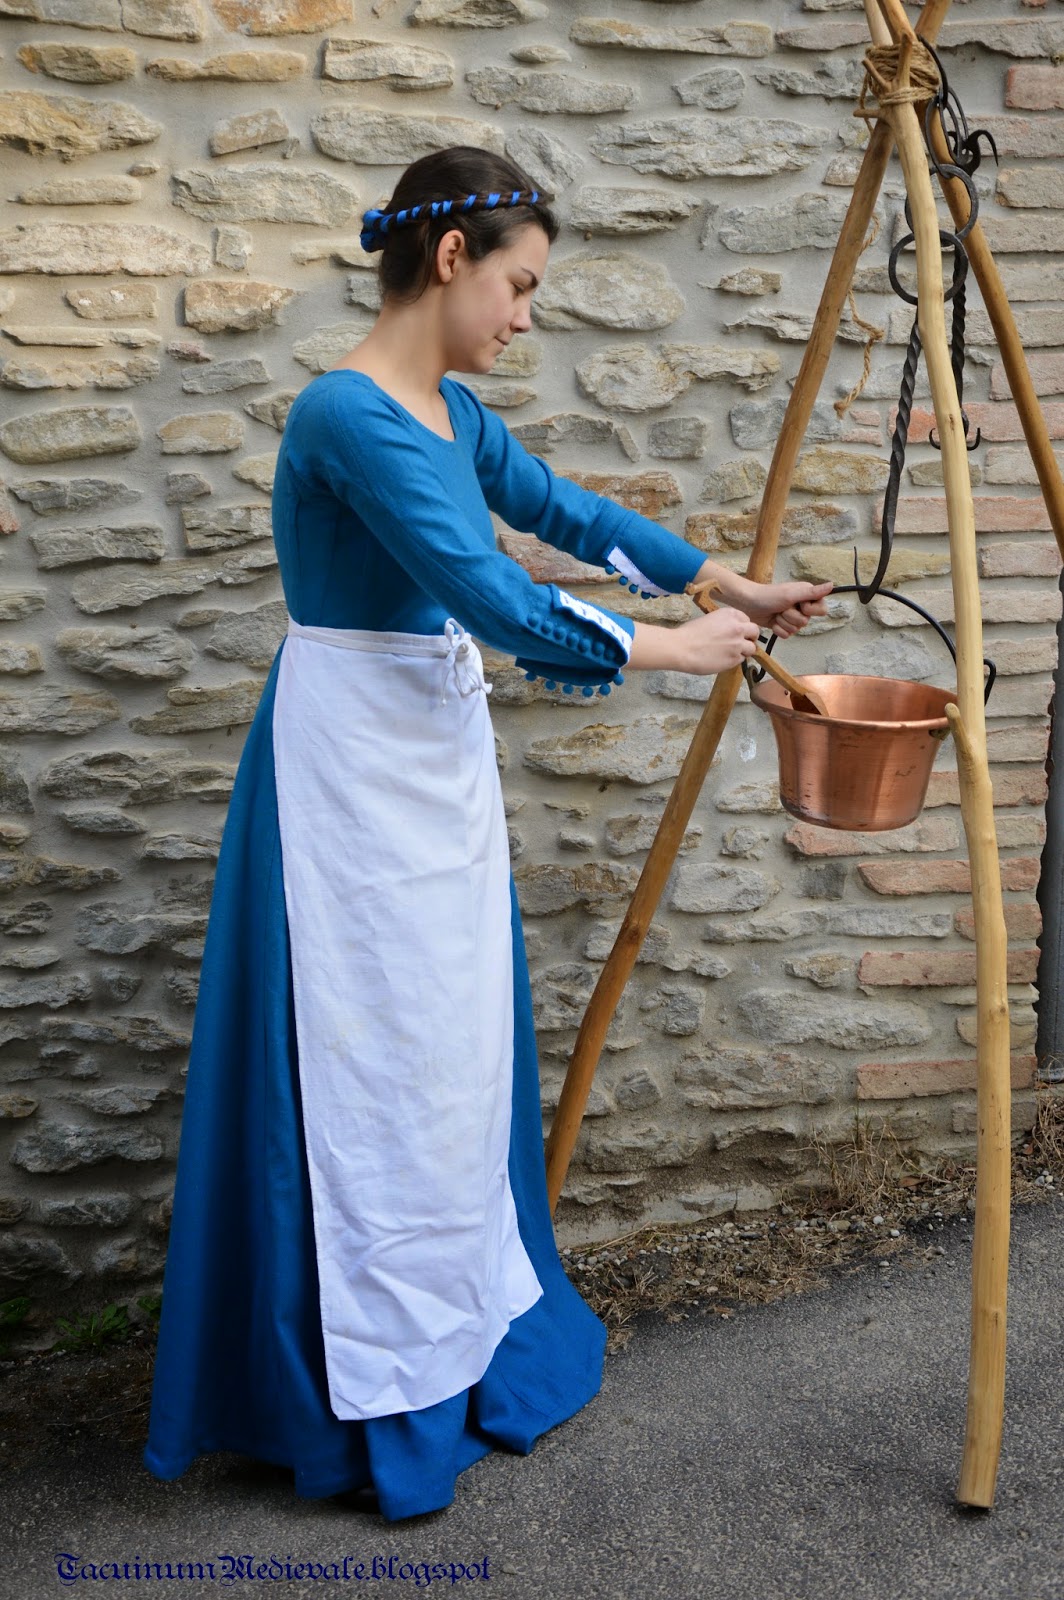
The Manuscript Challenge: il vestito blu dal Tacuinum Sanitatis / The Blue Dress from the Tacuinum Sanitatis


L'abito blu, basato sul Theatrum Sanitatis from Biblioteca Casanatense, Ms.4182, tav.117, ricostruito per la Manuscript Challenge, è finalmente completato: qui trovate tutte le informazioni sulla sua realizzazione.
Il modello
Ho deciso di utilizzare il modello ricavato dai reperti della Groenlandia Norlund 1b, prendendo come principale riferimento il reperto D10584 (Norlund n.42). Nonostante i dubbi riguardo all’uso di
Il primo modello con le "princess
seams". / the first toile with
the "princess seams"
modelli nordici per la moda europea ed italiana (1), ritengo comunque che sia accettabile l’utilizzo di questi reperti come riferimenti, sia perchè sono tra le pochissime fonti archeologiche disponibili, sia perché, con le necessarie modifiche, si prestano ad adattarsi anche allo stile continentale.
Il modello è composto da due parti principali, una anteriore e uno posteriore, ai quali sono aggiunti due pannelli su ogni lato e due gheroni centrali, uno anteriore e uno posteriore. Uno degli aspetti principali della sfida è stato dimostrare che è possibile realizzare un abito aderente come quelli presenti nell’arte figurativa del periodo senza allacciature o abbottonature sul busto: è stato possibile farlo grazie al tipo di lana, un twill 2/2, che, probabilmente proprio per questa sua caratteristica elasticità che lo rende adatto ad abiti aderenti, è uno dei tipi di tessuto più diffusi del Trecento.
Ho iniziato realizzando un modello di prova di un sottile tessuto di cotone: nonostante il risultato fosse piuttosto soddisfacente dal punto di vista del fitting, discutendone sul gruppo Facebook della “Manuscript Challenge” mi è stato fatto notare che i miei pannelli laterali erano nettamente più larghi (7-8cm) del reperto originale e andavano ad allargarsi sul seno formando le “princess seams”, cioè cuciture moderne, ben diverse come forma da quelle della Groenlandia. Ho rifatto un secondo modello, riducendo i pannelli laterali a 5 cm e dandogli una forma più rettangolare, come i reperti, in modo che le cuciture rimanessero sotto le braccia e non modificassero la linea del busto. A questo punto ho trasferito il modello su carta e ho infine tagliato la stoffa: una volta imbastito il modello, sono riuscita a renderlo ancora più aderente grazie all’elasticità del tessuto. Il gherone frontale parte poco sotto lo sterno, all’altezza dello stomaco, mentre quello posteriore è attaccato leggermente più in basso. L’ampiezza all’orlo è di circa 4 metri.
Le maniche hanno di base una struttura rettangolare, nella quale ho inserito un triangolo sulla spalla per garantire una buona mobilità: sono poi state modellate sul braccio e sull’avambraccio per renderle aderenti ma comunque confortevoli.

The blue dress from 
Theatrum Sanitatis from Biblioteca Casanatense, Ms.4182, tav.117 reconstructed for The Manuscript Challenge is finally complete: find out more about its construction here. 
The model
I decided to use the model from Greenland finds Norlund 1b, and chose as main reference the garment D10584 (Norlund n. 42). Despite of the doubts about the use of Greenlandic shapes for European and Italian fashion (1), I believe it’s acceptable to use these finds, because they are amongst the very few available sources and also because, with the necessary changes, they can be adapted to the continental fashion.

I pannelli laterali corretti. /
The fixed side panels.
The model is made with 2 main pieces, front and back, plus 2 panels on each side and 2 central gores, one on the front and one on the back. One of the main “challenges in the challenge” was to demonstrate it’s possible to make a fitted garments, as the ones shown in period pictures, without any lacing or buttoning on the body: it was possible to make it thanks to the wool, a 2/2 twill, which is a very common kind of fabric in the 14th century, due to its elasticity which is very useful to make fitted garments.
I started to make a toile with a thin cotton fabric: despite the fitting was quite satisfying, while discussing it on the Facebook group of the “Manuscript Challenge” it was pointed out that my side panels were definetly larger (7-8 cm) than the original ones and that they were even larger on the breast becoming the so-called “princess seams”, modern seams, totally different from the medieval ones. I started again and made a new toile, reducing the dimension of the side panels (5 cm) and giving them a more rectangular shape, as the finds, so that the seams stayed under the armpit and didn’t modify the shape of the body. Once happy with it, I drew the pattern on paper and cut the fabric. Once basted, I was able to fit it even more thanks to the elasticity of the twill. The front gore starts from the breastbone, on the stomach, while the back one it’s a little lower. The hem is 4m.
The sleeves are based on a rectangular pattern, in which it was inserted a triangular gore to have a good mobility: they were modelled on the arm and forearm to make them fitted but comfortable.


Attaccando il gherone. /
Sewing the gore.
Cuciture (in filo di lino blu)- Punto indietro e punto filza: ho utilizzato il punto indietro per attaccare i pannelli principali e quelli laterali dalle ascelle ai fianchi, mentre per la parte inferiore della gonna ho ritenuto sufficiente usare il punto filza (con punti molto piccoli, non ce n’è nessuno più lungo di 3-4 mm, like the originals). Il punto indietro è stato utilizzato anche per le maniche e per unire i due triangoli che compongono i gheroni anteriore e posteriore: uno dei due ha una finta cucitura, come quelle presenti su alcuni dei reperti.
- Punti dati dall’esterno per attaccare i gheroni. Questa cucitura si trova nei reperti della Groenlandia e permette di attaccarli in modo molto pulito e stabile.
- Sottopunto per rifinire le maniche e l’orlo.
- Rifinitura delle cuciture principali: ogni cucitura è stata stirata e schiacciata. Le cuciture dei fianchi sono state ripiegate su un lato, solo quelle delle maniche sono state aperte al centro e ripiegate su entrambi i lati. In tutte le cuciture è stato utilizzato un doppio filo di riempimento di lana perché il twill tende a sfilacciarsi molto: questa è stata senza dubbio la parte più lunga del lavoro, ma fondamentale per garantire la sua durata.
- Asole e bottoni: sull’abbottonatura ho inserito due strisce di rinforzo di lino, con circa 17-18 fili/cm. In alcuni reperti è stata trovata traccia di un rinforzo solo sul lato delle asole, ma sulla scorta di un affresco di Pomposa ho deciso di applicarla su entrambi i lati. I bottoni sono ricavati da quadratini di lana 4x4cm e cuciti con filo di seta, le asole sono fatte in filo di seta e hanno forma rettangolare.


Affresco dall'Abbazia di Pomposa, 1a metà XIV secolo. /
Fresco from Pomposa Abbey, 1st half 14th century.
Asole, bottoni e rinforzo in lino. / Buttons, buttonholes and linen facing.
Cucitura con filo di riempimento. /
Seam with filler thread.
Seams (in blue linen thread)
- Backstitch and running stitch. I used backstitch to join the main panels and the side panels from the armpit to the hips, while in the lower part of the skirt I decided the running stitch was strong enough (I used very tiny stitches, no longer than 3-4 mm, as the originals). I chose the backstitch also for the sleeves and to join the triangles which make the front and back gores: one of them includes a false seam, like in some of the preserved garments.
- External stitches to sew the gores. This kind of stitch is found on Greenlandic garments (and London???) and allows to attach them in a very clean and strong way.
- Hemming stitch for the hem and the sleeves.
- Finishing of the seams: every seam has been ironed and pressed. The side seams have been pressed on one side, only the ones on the sleeves have been split open in the middle and finished on both sides. I put a double woolen filler thread in every seam because this twill frayed a lot: this was certainly the most time consuming part of the work, but it was necessary to make it durable.
- Buttons and buttonholes: on the buttoning I decided to put 2 facings in linen, a densely woven fabric with 17-18 threads/cm to reinforce it. In some garments it was found a facing only on the buttonholes side, but I decided to put it on both sides, after a fresco from Pomposa. The buttons are completely in woolen fabric, from squares 4x4cm and sewn in silk thread; the buttonholes are made with silk thread and are box-shaped.

Pettinatura e altri elementi
Già alla fine dell’estate avevo fatto alcuni esperimenti per trovare una pettinatura compatibile con quella della mia miniatura: alla fine ho optato per una coda divisa in due parti e direttamente cucita sui capelli con un nastrino di seta, seguendo questo tutorial
L’abito è un primo strato, quindi lo indosso solo sopra la camisa supportiva di cui ho modificato la scollatura in modo che non si vedesse sotto il vestito, con le mie calze e le scarpe realizzate da Graziano Dal Barco. La donna della miniatura indossa anche un grembiule, per il quale ho usato quello fatto l’anno scorso

Hairstyle and other elements
Since the end of summer I started to make experiments to find a suitable hairstyle: in the end, I decided to go for a split ponytail directly sewn to the hair with a silk ribbon, following this tutorial
The dress is a first layer, so I wear it over the supportive underwear
(to which I changed the neckline to hide it under the blue dress), with my hoses and the shoes made by Graziano Dal Barco. The woman in the miniature wears also an apron, like the one I made last year.

Solo per divertimento :) Grazie a Francesco per aver elaborato la miniatura!
Just for fun :) Thanks to Francesco for editing the miniature!
Ringraziamenti:
Sono state moltissime le persone che mi hanno aiutata nella realizzazione di questo abito: grazie in primo luogo a Giulia, Giorgia e Vito che mi hanno regalato la lana e hanno seguito con trepidazione ogni fase, a Francesco per avermi aiutata nel modellare il vestito, a Nini per tutti i consigli sartoriali che mi ha generosamente dispensato nel corso dei mesi, a Margherita per l’aiuto a realizzare la pettinatura giusta, a Maria Neijman, Mary e tutti gli altri partecipanti della Manuscript Challenge che sono sempre stati di grande aiuto. Tutti gli errori e le imprecisioni sono naturalmente da imputare a me solamente. 
Questo vestito è dedicato alla memoria della mia nonna Maria (15.09.1931-3.3.2015): le nostre ultime ore felici insieme sono cucite qui. 
Thanks
There are many people who helped me while making this dress: first thanks to Giulia, Giorgia and Vito who gave me the wool as a gift and followed every step, to Francesco who helped me fitting the dress, to Nini who answered my questions and gave me a lot of useful suggestions during these past months, to Margherita who helped me to realize the proper hairstyle, to Maria, Mary and all the other participants of the Manuscript Challenge for their support. All the mistakes are of course all my fault.

This dress is in loving memory of my grandmother Maria (15.09.1931-3.3.2015): our last peaceful hours together are sewn here. 

Riferimenti bibliografici / References
(1) - The View from Herjolfsnes: Greenland's Translation of the European Fitted Fashion, R. Netherton, Medieval Clothing and Textiles, Volume 4, 143-173.
2 Woven into the Earth: Textile finds in Norse Greenland, Else Ostergaard
3 Medieval Garments Reconstructed: Norse Clothing Patterns, by Lilli Fransen, Shelly Nordtorp-Madson, Anna Norgard, Else Ostergard